Painting With Pixels
(As seen in the July-August '05 SCBWI Bulletin)
by Elizabeth O. Dulemba
 After years of struggling with acrylics, watercolors, gouache, markers, and colored pencils, I have finally found my medium. It just didnt
exist yet - I am a digital artist. After years of struggling with acrylics, watercolors, gouache, markers, and colored pencils, I have finally found my medium. It just didnt
exist yet - I am a digital artist.
Im not talking about the bit-mapped computer looking art that came into fashion with the invention of vector based programs such as Freehand and Illustrator. Im talking about art, created on a computer, that doesnt
look like it was created on a computer.
Adobe first opened that door in 1990 with the raster
based image editing program Photoshop (think dots of color versus mathematical
equations). I started experimenting
and was lucky to grow with it as it grew more complicated.
Then came Painter - a behemoth. It made almost every tool in a traditional art studio available at the touch of a button, but computers werent ready yet. I could draw a squiggly line only to have the computer catch up a few seconds later. It wasnt
a viable tool.
Today, computers have caught up. I work on a dual
2 GHz PowerPC G5 with 3 GB DDR SDRAM with dual monitors and an Intuos 2 Wacom
tablet and pen mouse (grunt,
grunt). All that means is, I can finally use Painter.
I wont lie, mastering Painter is difficult, although using parts of it isnt
that bad. Painter is just different enough from Photoshop to be confusing, but
they each have their strengths and I rely heavily on both of them.
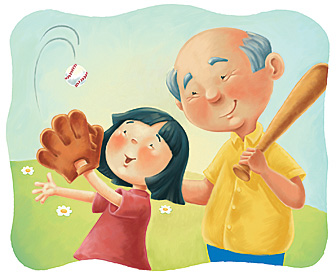
Heres how I work. First, I hand sketch. To me, nothing can replace those quick, vibrant, motion lines, and it just feels good. I draw the elements separately and scan them into Photoshop. There, I create a document 100% the size Ill need (with 1/4 bleed) at 300 dpi (the standard resolution in the printing industry). If its a piece for my web site, I work in RGB. If it will be printed, I work in CMYK (also the standard). I pull my pencil scans into this new document and tweak their placement until Im happy with the composition. I flatten the sketches into one layer and clean it up. I set that layer to multiply making
it transparent to layers below - then create a new layer underneath and add flat
color. When finished, I duplicate the color layer (more on this later). I try
to have as few layers as possible, ideally only three or four, before I pull
the file into Painter.
In Painter, I use the bottom color layer as a selection
tool. I can select a solid color, go to the top color layer and work to the edges
without worrying
about going outside the lines. The alternative is to create paths - a viable
option, but not quick.
The top color layer becomes my render layer. This is where Painter gets fun. Out of the infinite number of media and brushes available in Painter, my favorite is the Oils - Round Camelhair brush. (Funny, I never tried oils before.) When I really started working with Painter, I sprouted wings. Suddenly I could achieve transparency, depth, saturation, and texture that I couldnt get with other media, and I dont
have to mix any colors.
As much as I love Painter, it has crashed on me. When it did, it took my file with it. Therefore, I save at least two versions of everything I create every time I save - even if my file is 500mb. Im not kidding. I save my files as .psd, not the .riff compression file option, because .riffs wont
open in Photoshop. I save often.
 Once I have my art rendered the way I like, I pull it back into Photoshop. Photoshop shows true color better than Painter (color calibration can help, but thats another article). Im sometimes disconcerted by how much color changes between Painter and Photoshop, and avoid doing it more than once, but its simple to tweak the hue/saturation and curve adjustments in Photoshop. I then flatten the document - turning all those layers into one finished piece. To send art out, I save the flattened document as a .tif, which I call the cant mess with me version.
I burn it to a CD or DVD and send it to the publisher. Once I have my art rendered the way I like, I pull it back into Photoshop. Photoshop shows true color better than Painter (color calibration can help, but thats another article). Im sometimes disconcerted by how much color changes between Painter and Photoshop, and avoid doing it more than once, but its simple to tweak the hue/saturation and curve adjustments in Photoshop. I then flatten the document - turning all those layers into one finished piece. To send art out, I save the flattened document as a .tif, which I call the cant mess with me version.
I burn it to a CD or DVD and send it to the publisher.
There is one hiccup in digital art which I am still working to resolve - I dont see how the art will really look until it is printed. That may sound horrifying, but the same can be said about hard copy art that goes from photography to transparency to drum scanning. I get around this by obtaining giclee prints of my art for final approval. There is no hard copy original when working digitally - a giclee is as close as it gets. Thats
why I plan to invest in an Epson 2200, a desktop giclee printer. Not only will
I use it for limited edition prints, but I will keep all my color proofing in-house.
I also keep my eye on desktop color proofing systems which have made some interesting
improvements lately.
If your eyes glazed over in my second paragraph, digital art is probably not for you. For me, however, its been incredibly exciting. I can finally get an idea from my head to paper in a fairly close representation. Digital is another medium - thats
all it is - but it is by far my favorite. Now, I am free to create.
Elizabeth was a SCBWI featured artist in 2004.
View step-by-step examples of her process HERE.
|
|
