Illustration Friday: Smoke
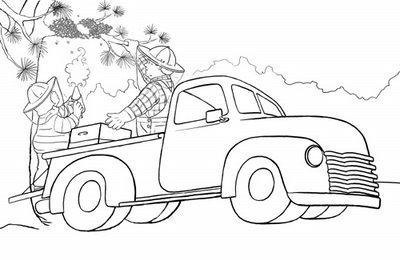
Well, I had about three pieces of art that fit this week's theme, however they were all still in black and white. So I'm going to take one of them all the way and show you my progress. This is a piece from my picture book dummy, "Queen Bea." First is the line-art version. I usually do sketches, scan them into the computer, then arrange my composition. Sometimes I then do a cleaned up line-art version to then work from. But I have to say I probably won't create line-art anymore. Editors seem to respond better to pencil sketches - where things look more rendered in black and white. My line-art seems to have more of a cartoony look that doesn't hint enough at the extent the final piece will be rendered.

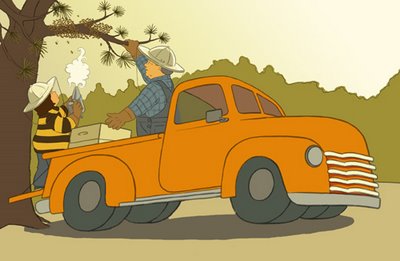
So here is my next stage, flat color. I set the pencil or line-art layer to multiply in Photoshop. I work on a flat color layer below it. I may go in and add a few more color blocks to indicate light and shadow, but this is almost finished with stage 2.

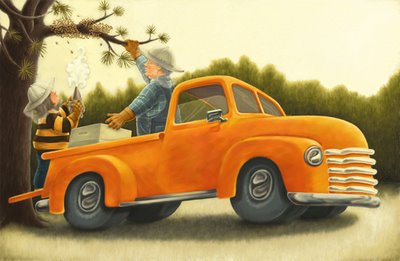
Next I'll pull it into Painter where I do my shading and rendering. You'll have to check back to see how the piece ends up - it usually takes me a few days.

Update: Thanks for all the great comments - I'm so glad some of you find my process helpful. I used my weekend to finish the art - isn't that what weekends are for? Anyhow, the last step was to render in Painter then pull it back into Photoshop for minor adjustments. Click on the final piece to get a better look.

So here is my next stage, flat color. I set the pencil or line-art layer to multiply in Photoshop. I work on a flat color layer below it. I may go in and add a few more color blocks to indicate light and shadow, but this is almost finished with stage 2.

Next I'll pull it into Painter where I do my shading and rendering. You'll have to check back to see how the piece ends up - it usually takes me a few days.

Update: Thanks for all the great comments - I'm so glad some of you find my process helpful. I used my weekend to finish the art - isn't that what weekends are for? Anyhow, the last step was to render in Painter then pull it back into Photoshop for minor adjustments. Click on the final piece to get a better look.


18 Comments:
I'm looking forward to seeing the remainder of this series of posts - as a relative newbie to illustration, it will be a very useful primer!
wow! great illo!
i really like the colors ;)
This is great for the topic! I enjoy seeing the various stages.
wonderful!! wow!
nice work. i like the fall colors.
Love hearing how you do it. Inspiring to me, just beginning digitally. I am struggling with Painter. Can't wait to see the finished product. It looks great so far.
nice lookin truck not to mention the rest of the illo
wow...wonderful illo
love it
Very nice illo! love it.
It looks wonderful Elizabeth! The time that it takes to create such fantastic art is worth it. I like the line art so much...but would love to see a comparison sketch at some point. I'm waiting for the next installment.
Ah the almost final final! It looks just great. I love the progression and the additional texture. Thanks for sharing!
Very cute...
Wonderful! What a great take on the subject. I like how it looks in stage 2 also. The flat colors give it a quiet, retro feel.
What a beautiful finished result! And thanks for sharing your process, there is a generosity of spirit there for sure! Your work is dazzling.
Love the woman's "bee" striped top!! Very clever!
Wow - what an wonderful blog and awesome illo!
Thank you for the progress pictures -- it really is hard for most of the people to see a line drawing and imagine it as a finished piece. Speaking of finished -- lovely illustration!
Great to see such a unique idea! Great illo!
Post a Comment
Links to this post:
Create a Link
<< Home